
Design
Mark the important features before review
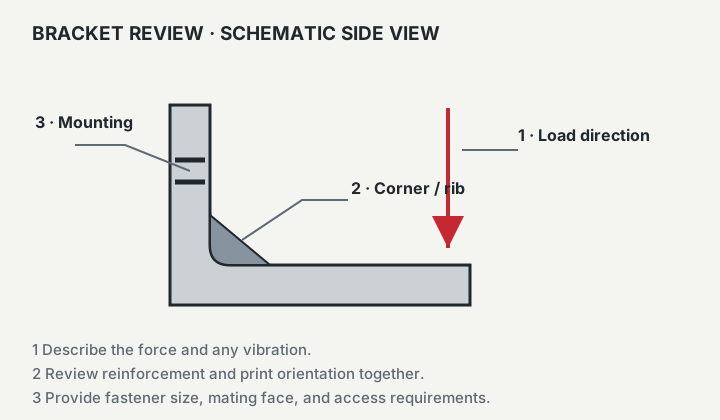
Use an annotated sketch to show which surfaces locate or mount the part, how the load is applied, and where tools or hands need access. The diagram is a schematic example, not a production drawing or a tested load rating.
Design
Start with the load path
The most important question is not what the bracket looks like. It is how the force actually moves through the part.
If the load tries to peel layer lines apart, the part is living in a higher-risk orientation or geometry condition than it needs to be.
Start by marking the fixed mounting face, the loaded face, and the distance between them. Long offsets create leverage, and leverage is usually what turns an innocent-looking bracket into a weak part.
- Find the highest-stress corner or transition first.
- Avoid making the whole design depend on a thin unsupported tab.
- Think about tension, bending, and leverage, not just static shape.
Design
Use ribs and fillets aggressively
Many weak printed brackets fail where a thin wall meets another wall at a sharp inside corner. Ribs and fillets spread stress out and add stiffness without making the whole part huge.
A rib that follows the load path can be more useful than simply adding thickness everywhere. A fillet at an inside corner also gives the slicer more continuous material to work with instead of concentrating stress at one sharp transition.
- Add generous fillets where arms, webs, and mounting faces meet.
- Use ribs to stiffen spans instead of making the whole part massively thick.
- Avoid long skinny webs with no support geometry.
Design
Protect screw holes and mounting faces
Fasteners are often where printed brackets get abused. A screw can crush a thin boss, a washer can dig into a narrow face, and a tight hole can split during assembly.
Leave enough material around holes, plan for tool access, and use slots when the real mounting pattern may not be perfect. If the bracket will be removed repeatedly, heat-set inserts or post-drilled holes may be a better plan than relying on printed threads.
- Leave wall around holes instead of placing fasteners near thin edges.
- Add washer or screw-head clearance so assembly does not damage the part.
- Use slots for field alignment when the mating surface is hand-measured.
- Call out repeated assembly so insert or post-processing choices can be considered.
Design
Choose material after the geometry is honest
A stronger material cannot fully rescue a bracket with a poor load path. First fix the shape: reduce leverage where possible, add ribs, thicken critical areas, and smooth transitions.
Once the geometry makes sense, material choice can add margin. PETG is a practical default for many functional brackets, while PETG-CF or PET-CF can help when stiffness and a more stable feel matter.
- Use PLA mainly for indoor fit checks and very light-duty brackets.
- Use PETG for tougher everyday mounting and utility parts.
- Use carbon-filled options when stiffness is the real problem.
Key takeaways
What matters most
- The load path matters more than the silhouette.
- Ribs and fillets often improve strength more efficiently than brute-force thickness.
- Bracket performance is a geometry and material problem together.